So you have your cosplay antlers sculpted. Now it’s time to bring them to life! Painting antlers to look realistic is not as complicated as you may think. In this tutorial, I’ll go step by step through the process I used to paint the antler for my Dark Souls 3 Pyromancer Crown.
Painting antlers? Why not paint them a solid color?
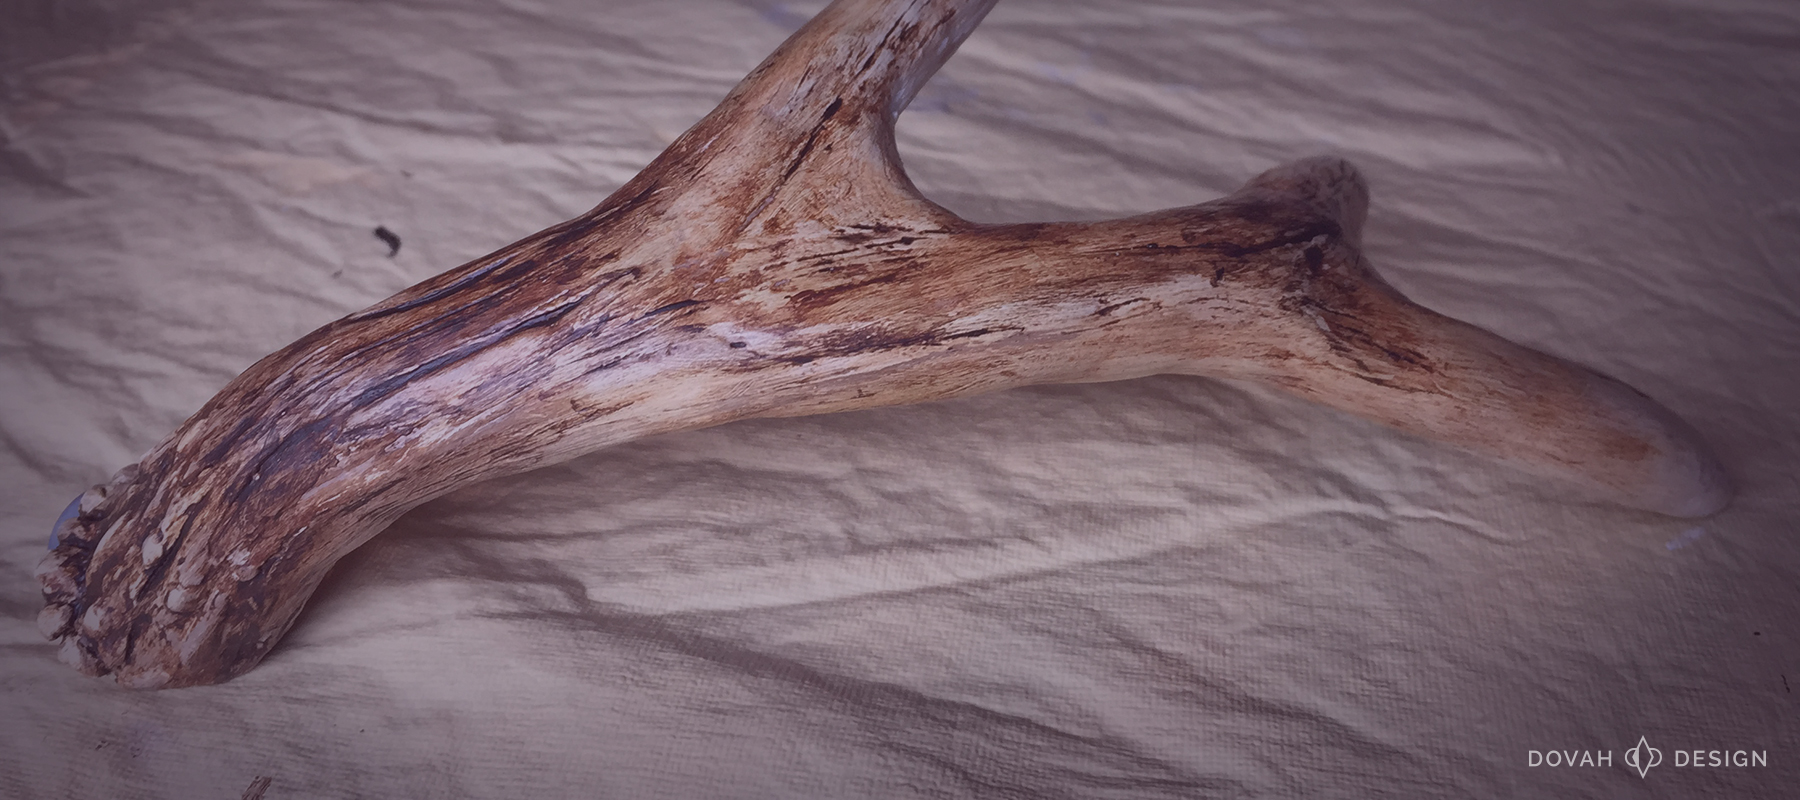
The answer to this question depends heavily on the cosplay you are making. If your costume’s antlers will look best in a solid color, feel free to follow only steps 1, 2, and 5 of this tutorial. If your cosplay happens to require a realistic, weathered look, then a single color will not bring out the life you are looking for. Mixing custom colors when painting antlers can create the realistic, distressed look many cosplays need. To the right is a sample of the antler I am recreating from Dark Souls 3.
A real, weathered antler has several different tan and brown hues and tiny details. The first step to achieve a realistic look when painting antlers is having the right textures sculpted to fill with your paint. Still need to craft your own custom antlers for cosplay? Start with my cosplay antler tutorial– no mold making required!


Tools & Materials Needed:
- Reference photo of your character or prop
- Fine Grit Sandpaper
- White acrylic gesso
- Paint brushes in various sizes
- List paper and a pen for documenting your paint colors
- Water (and small ramekin or bowl)
- “Academic-Level” acrylic paints, colors vary by cosplay (I prefer to use Liquitex Basics
)
- Paper towels
- Paint Palette
or similar for mixing colors
- Paint mixers (I use toothpicks)
**Optional Tools and Materials**
-
- Spare containers for storing extra mixed paints
- Drop cloth
or newspaper to protect your table
- Real antler, or antler photo, for reference
- Small personal fan
(aids with the drying process)
Prep Your Work Area
Before you get started, I suggest you prep your work area for painting! Lay out an old sheet, drop cloth, or newspaper, and gather up your supplies. Ready? Then let’s go!
Step 1: Lightly buff your sculpted antler
Once your antlers are sculpted and completely dry, we can prep them for paint. Cut yourself a small piece of fine grit sandpaper. I suggest using a “fine” sandpaper, between 120 and 250 grit, and optionally up to “ultra fine” 400 grit. Remember, the higher the grit, the finer the sandpaper. Using a “very fine” or “ultra fine” sandpaper alone may not do enough work to remove the clay chunks on your antlers. So, start low and work your way up if you so desire.

Being careful to preserve your sculpted grooves, gently buff the outer Paperclay layer of your antler.
The goal is to simply remove any chunks of clay on the surface, and subtly smooth the flat sections on the antler. Real deer antlers tend to be more textured on the base of the main stem near the burr, and smoother toward each fork and tine (where the antlers divide and taper to a point), so keep this in mind as well as you sand.
Here is a comparison of my sanded clay antler and a real antler for reference:

Step 2: Apply gesso as a base coat
While Paperclay will take paint without a primer, it is very porous, and will actually absorb paint. This results in a darker color when dry, and a rough finished texture. A layer of gesso acts as a plastic-like barrier between your paint and the antler’s surface. In our case, it prevents the Paperclay from absorbing paint, and gives our antler smooth, even look across the entire surface. The gesso layer will also keep our paint colors bright when applied on top.
I prefer to pour my gesso into a separate container with a rubber band stretched over the open side. This gives me a place to wipe the excess gesso off of my brush without crusting up the sides of the container (see below). It also keeps my unused gesso fresh and free of debris from dipping.

Apply a thin layer of gesso to the antler with one of your paint brushes, starting at the antler points (tines) and working your way down. Be sure to smooth out any drips as you go. Depending on how thick you apply the gesso, and on the shape of your antler, the tines may be dry enough to balance the antler on when you have finished your coat. If not, or if your antler can not balance on the tines, hold your antler by the mount base to allow it a few minutes to dry before setting the antler down. This is where a small personal fan is great for speeding up the process.

Repeat this process on your second antler, and set both antlers to dry while you move on to the next step.
 NOTE: I prefer to pour my gesso in to an old Tupperware container with a lid. When I’m done using it, I lay a piece of cling wrap directly on the surface of the gesso before I close the container lid. This helps keep the the extra gesso from drying out, significantly extending its shelf life!
Step 3: Choose your colors
Before you start to mix, make sure you have a reference photo of your cosplay character visible. Look closely at your image and identify all color shades you see in the antler. List them out on your paper, and then try to order them from darkest to lightest (or vice versa). Listing them in order can help reduce the number of times you need to mix a color from scratch. For instance, you may be able to combine a dab of your dark mix with some white to create one of the lighter shades you need.

Some examples of video game characters with antlers.
I recommend identifying at least three colors for painting antlers. For reference, I mixed 7 colors to paint my antler! As you mix, it is important to select hues with “cool” and “warm” color biases for the most realistic effect. For an in depth look on what it means to select and mix “cool” and “warm” colors, check out this article by painter Carol McIntyre. She goes in depth about how to identify color bias in your paints, and has many educational blog posts on paint mixing and color theory. If you find you still need some help identifying which acrylic paints have a warm or cool color bias, this handy color temperature list from Gamblin may help you get started: Gamblin Color Temperature List
Step 4: Mix your paint
When your color list is complete, gather up your base colors, your paint palette, and some toothpicks for mixing. A disposable plate, glass plate, or old tupperware also make great paint palettes!
Here are the acrylic colors I used to create my color mixes (with their color bias in parenthesis):
- Raw Umber (Cool)
- Raw Sienna (Warm)
- Burnt Umber (Warm)
- Aqua Green (Cool)
- Naples Yellow Hue (Warm)
- Yellow Ochre (Warm)
- Titanium White (Neutral)
- Ivory Black (Neutral)

NOTE: Whenever I’m unsure about how much of a color I need to mix in, I add a small “dab” of color on the palette next to the base color. I slowly mix the side color in, a little at a time, until I am happy with the results (hence, all the color spots next to my palette wells in the photo below). I find this method encourages me to experiment, and keeps me from wasting a large amount of paint if I am unhappy with a result. (See the sample at left)
In my descriptions below, I’ll refer to this as the “slow mix method.”

As I mentioned earlier, I made seven color mixes to paint my antler. Below is a detailed list of each color mix I created.
Paint Color 1:
This is the lightest color shade I mixed. It is Titanium White as a base, with a dab of Raw Umber, and a dab of Yellow Ochre. I used the slow mix method until I found the hue I was happy with.
Paint Color 2:
About five parts Titanium White to one part Yellow Ochre. I also mixed in a dab of Raw Umber, and a dab of Aqua Green. Aqua green helped to tone back the “bright yellow” of my paint, resulting in a natural, neutral hue. Just be sure you use the “slow mix method” to add the Aqua.
Paint Color 3:
Approximately four parts Titanium White and one part Raw Umber. This gives you a simple, cool-bias tan.
Paint Color 4:
Burnt Umber as a base, and one part Raw Sienna mixed in. The result is a bright, warm-biased brown.
Paint Color 5:
Raw Umber with just a dab of Ivory Black.
Paint Color 6:
Three parts Titanium White, with one part Naples Yellow Hue. Then “slow mix” Aqua Green in. I added more Aqua Green to this color for a more vibrant color. I did not paint with this color on it’s own, but rather used it to mix in paint color seven.
Paint Color 7:
This color consists of color six, mixed into a small amount of white.
 NOTE: I find writing down my recipes as I mix is extremely helpful for future projects. I even add a dab of the paint color next to my written recipe!
Step 5: Apply your lightest paint color as a base coat
Once both of your antlers are coated with gesso and completely dry, you can apply your first coat of paint. I typically begin with the lightest color, and work up to the darkest. In my case, the lightest shade I decided to use was color number two. You only need a small amount of paint on your brush, so take a small dab, and begin applying the paint at the antler points. Spread the paint in to a thin layer, working your way down to the base. Add more color to your brush as needed.


As you can see, this color was a nice shade of tan with a cool color bias. When lined up next to my real antler sample, the shades were close to identical, so I was quite pleased with the result! I did notice some cool yellow highlights on my real antler, so it was at this point I mixed and applied small patches of color number seven on top of my first coat.

There we go! The yellow added a subtle touch of more color that I was looking for. Time to move on to our medium paint shades.
Step 6: Apply medium paint colors
If your antler is like mine, there are a few shades of medium brown visible on the main branch and base of the antler. This was my color number 3, the mid-tone. Using a very small amount of paint, lightly “dry brush” the portions of your antler where you want the mid tone to be. In my case, I needed this tan mid tone to cover the whole base up to the first fork, but needed some of the light color to show through. Like so:

NOTE: To ensure realism, remember to wipe the bumps on the bottom of your main beam and burr clean of paint. The bumpy extrusions and burr tend to be lighter in color than the surrounding areas.
The main branch wasn’t the only place I identified my mid tone. I could see the mid tone in the grooves of the antler branches as well. If you’re thinking “Oh great, this detail work will take me forever,” think again! This is the easy part. Apply small amount of your paint over a small portion of your antler, covering the grooves you wish to fill in. Then, gently wipe away the topmost layer with a damp (or dry) paper towel. The result is your mid tone stuck within the sculpted grooves. Just be sure to work in small sections, or your paint will dry before you can wipe the top layer away!


It might not look like much, but continue to fill in the details with your mid tone. After a few passes, BAM! You’ll see instant texture and depth! Our antler is already looking realistic:

Step 7: Apply dark paint colors
If your reference image is like mine, a mid tone won’t give us the complete look we are going for. Our antlers need some serious dark tones and distressing before we can call them complete. Let’s start with color four, our mix of burnt umber and raw sienna. This time we’ll be using paper towels to actually apply the paint.
Start with two clean paper towels. Taking one, gripping it in such a way that it covers the index finger on your dominant hand. Dip this paper towel in your water bowl carefully, so it is just slightly damp. The idea is to thin out the paint we will be applying, but only very subtly. You may need to squeeze out the towel and reposition it on your index finger if it absorbs too much water.

Use your second paper towel to wipe away any excess color, or to aid in spreading the color thin. Be sure you take your time with this step. Work slowly and methodically, fixing any imperfections you notice along the way.
My antler reference is very dark, and this color extends a long way up the base. Yours may not need color in the same location, so be sure to continue referencing your source photo.

NOTE: Acrylics dry very quickly, especially when being dry brushed or spread thin with a paper towel. While you are painting, remember your time to correct any mistakes is limited. Always keep a wet, clean paper towel on hand to rub off any paint you are not happy with immediately. If you don’t fix a problem spot in time, never fear – – Acrylic is easy to cover up and start over with, too!
Step 8: Add your darkest color to the deepest grooves
An old object has seen a lot of years, and over the natural course of time, collects dirt and grime in the deep imperfections. Painting antlers to mimic this look is easy – we just need our darkest color paint, color number five.
To fill the crevices, we’ll be using the same method we did in Step 6. Apply small amount of your paint over a small portion of your antler, covering the grooves you wish to fill in. Then, gently wipe away the topmost layer with a damp (or dry) paper towel. The result is your mid tone stuck within the sculpted grooves. Remember to work in small sections!

This time, you may need to use your brush and dab on some extra splotches of dark color on the base of the antler near the burr. Use a damp paper towel to help blend out the edges of the portions you blot. You can also use this paper towel to remove any dark paint from the burr bumps, which tend to be lighter in color on a natural antler.
Check it out! That is one realistic looking antler. So much dirt in the crevices – WOW! (wink wink wink)


Step 9: Look over the antler for any extra details (Optional)
While this step is fully optional, it’s generally a good rule of thumb to give any of your painted pieces a final look over before you decide they are finished and ready to be added to the whole of your costume. Some things to check for include:
- Are the bumps and burr of the antlers lighter in color than the surrounding base? Naturally these bumps are lighter in color, so paint over with a dash of your lightest color if needed.
- Did you fill in all your deep crevices with dark paint?
- Are all the visible portions of your antler painted? Test your antler on your costume base to make sure all the surfaces look covered.
- Does it match your reference photo? It’s easy to get tunnel vision and forget to reference your photo!
Ta-da! Your antlers for cosplay are painted!
Here’s a look at the finished Pyromancer Crown once painted and mounted to my base:

I hope this post has been helpful for you! Feel free to contact me with any questions you have about painting antlers, or any other cosplay questions!
Erei mu grind!
Still need to mount your painted antler to your costume’s base? Check out Step 10 of my Crafting Antlers for Cosplay tutorial here.
**Full Disclosure: I get credit when you purchase items via my Amazon links in this blog post! Any profits I receive from Amazon will go directly back into more blog posts and tutorials. Thanks in advance for considering a purchase 😀
